Category Archives: technology

How to choose a night vision security camera

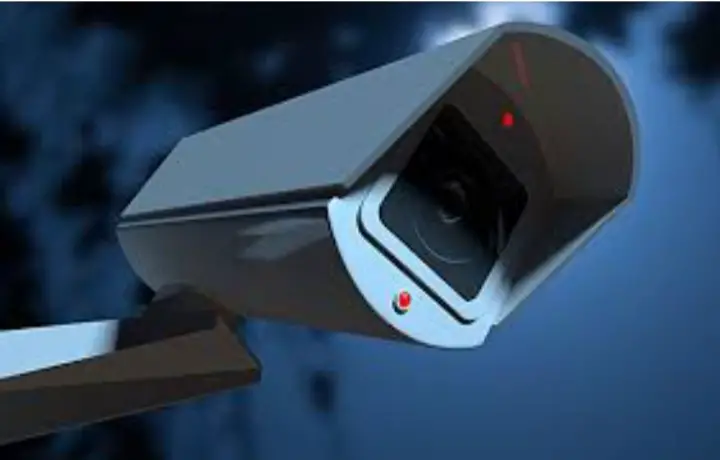
How to choose a night vision security camera, compiled here. Nowadays, it is easy to keep an eye on what is going on at home, workplace, school, and any other places. This is due to the availability of security cameras or CCTV in the markets. The market of security cameras have been expanding over the years. We also have night vision security cameras which are many people’s favourite.

If you are one of the people who prefer night vision security cameras, then you are at the right place. In this article, I am going to take you through guidelines on how to choose a night vision security camera. Let’s dig in.

How to choose night vision security camera

What are night vision Camera

It is important to know how to choose a night vision security camera, but what is it. We can take you through about a night vision camera here. In simple terms, a night vision security camera is a cameras type that has the ability to see in low light or even in no light conditions. This cameras use infrared (IR) led illuminators to see after they’ve emitted invisible light. The camera can produce clear images or videos from low light environments using the invisible light.

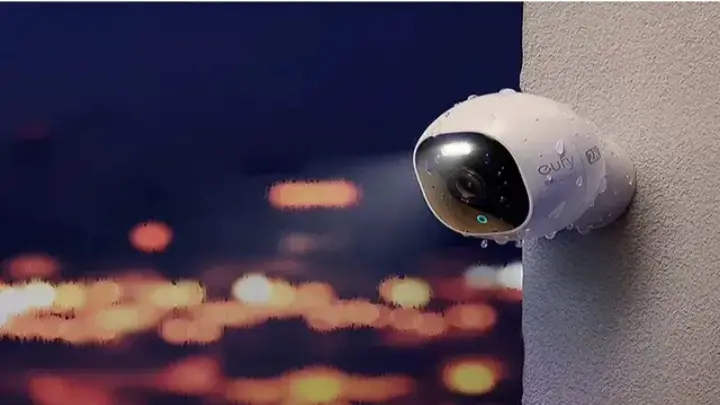
We have colour night vision camera which have the ability to capture coloured videos at night. The colour night vision camera have special infrared technology that give them this ability.

Types of night vision camera

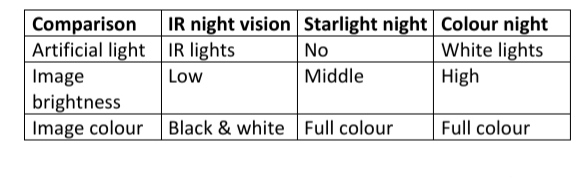
The night vision security camera is divided into three types. They include colour night, IR night vision, and starlight night vision. Every type of camera have special technology that supports them, therefore yielding different effects.

Consider the table below as you are looking on how to choose a night vision security camera. The table below shows the comparison of the three types of night vision security cameras.

How to choose a night vision security camera

Black & White Vs colour night vision camera, which one will suite you?

Are you about buying a colour night vision security camera instead of black and white. There are important points here you’ll have to know first before making your decision. Below are the 5 factors that are important in your decision making process.

Must read 15 pros and cons of selling feet pics you must know

Image quality

Night vision security camera of high quality can capture colourful footages as well as black and white videos. Some of the examples including spotlight cameras and starlight night as mentioned above. In most cases, people prefer colour night vision since they’ll require more details like colour of vehicles, clothes, and more. Apparently, those details are very crucial when it comes to police investigation. On the other hand, a black and white camera will only help you to identify the things happening and how the surrounding like people, and other things look like. Therefore, if you only want to monitor things like livestock, and other things that don’t involve people. Then you can still go for a black and white security camera as it’ll still satisfy your basic needs.

Image from Google.

Long range night vision

When it comes to long range, the black and white (infrared) night vision camera will cover long range compared to colour night vision. For instance, if you use them in 100 feet distance, black and white mode will give you clearer images as compared to colour mode. Colour night vision will only capture images on specific distance limit of about 30 to 50 feet. In some cases, a number of cameras have both spotlights and IR LEDs to make things better in terms of long distance footages.

Price

In terms of price, starlight security camera may be a little costly compared to other security cameras that don’t have the starlight image sensors. In terms of price, the infrared cameras are considered to be most affordable and common. The cameras are black and white and are still an option at night. Basically, the colour night vision camera is expensive than black and white night vision camera.

Installation scenario

Places like driveways, entrances, front and backyards are some of the key places where colour night vision will work better. However, you can still use the black and white camera on some areas where much attention is not needed.

Key features to consider when choosing night vision camera

A number of factors will affect your choice of selection. The features below are important for a top high-quality security camera.

How to choose night vision security camera

Super aperture

Security cameras with super aperture are the best option due to their large lens opening. Therefore, this will allow more light to get into the image sensor. In simple terms, super aperture will yield brighter and clearer images. Super aperture will enhance the quality of the images. It is one important factor to consider while choosing the best night vision camera.

High resolution

This is another key factor to consider when choosing night vision camera. The security camera should at least have a resolution of 1080p (1920 × 1080). When the night vision security camera has more resolution, it will be able to record more clearer footages. Some simple but critical details like license plates number, and facial details can be captured.

Also read How to choose the right CCTV camera

Long range

Long range means how far or the distance your night vision camera can be able to capture at night. A great night vision camera should be able to see a distance of at least 30 feet. We’ve tested night vision cameras like Reolink Go Plus & Reolink Argus 3 pro which can see up to 33 feet. We have RLC- 823A 190 feet & RLC- 810A 100 feet go up to 190 feet.

3D DNR

It is also referred to as multidimensional digital noise reduction.

The essence of this technology is to remove image noise. It also compensates image distortion caused by colour bleeding errors by extrapolating and image distortion. This basic performance are important for a quality night vision camera.

Wide field of view

A surveillance camera with a wider angle of view will automatically capture more objects or area. This point is important in our article how to choose a night vision camera. Therefore, go for a night vision camera with a wider field of view.

How to choose night vision security camera

Final Word

The above are our tips on how to choose a night vision security camera. You can consider the points while selecting your security camera. Also, always remember that the place you want to put your night vision security camera will also help you determine the best option.

Don’t go for more if you want to keep your night security camera in places with less visitors.

How to remove advertisements on dream league game 2023

How to remove advertisements on dream league game 2023, compiled here. Dream league is one of the most popular football games today. It has millions of downloads from Google play and a number of positive reviews. No doubt that dream league game has a lot of fans who are currently using it. If you are enjoying using this game and you are tired of advertisements. In most cases, you may encounter video ads during the half time break of your game.

Some individuals normally switch of their data in order to avoid those video ads on half time break. But falcomdaily will give you a permanent solution to avoid those video ads. Before I take you through the steps to remove advertisements on dream league game, here is what you need to know about advertisements.

Must read 7 Best football games for Android

What you need to know about advertisements

It is important to know some things about those advertisements in DLS Mobile game. The following are the points to note;

  • Some video adverts will earn you some coins.

You may be looking for a way to earn more coins on your dream league game. You can select a video advertisement on the game which earns you some coins.

  • You can get rid of ads on dream league without ad blockers.

This is what I am going to help you do, getting rid of video ads without installing ad blockers. Some ad blockers may not work and you’ll also require data and space in your device to install ad blockers.

  • You can get rid of personalized ads that come after half time of every matches on DLS.

This is what I’ll also be helping you do in the steps below. Therefore, Follow the steps below keenly.

How to remove advertisements on DLS 2023/24

Here are the steps on how to remove advertisements on dream league game. Apparently, adverts normal disrupt gamers at half time break when playing DLS.

Step 1 Access your dream league game then go to your team. Example on screenshot below.

How to remove adverts on dream league game.
Image from Dream league game.

Step 2 Locate the settings icon on top left corner like in the image below.

The settings icon has been circled in our screenshot below. Step 3 After accessing the settings, you can go to advanced settings at the bottom right corner.

Step 4- You’ll see the headings, Sign in with Google, personalized ads, and personalized notification.

Locate personalized ads which is on. You can switch it to off and you’ll have removed the advertisements.

How to remove adverts on dream league game.

Final word

Those are the steps on how to remove advertisements on dream league game. Once you have competed the steps above, you won’t be distracted by those video ads during half time breaks. In case you see one, then go back and make sure that you’ve switching off.

How to set watermark in Microsoft word

How to set watermark in Microsoft word (Standard/Custom), compiled here. Microsoft word is widely used in many institutions/places. We have schools, hospitals, and more others. If you aren’t sure what watermark is, in simple words it’s a picture or word that appears faintly behind your text in the word document.

You can try to watermark the documents you have drafted. Alternatively, you can also watermark a duplicate document and compare. Microsoft word will allow you to include standard or custom watermark in your documents using some steps as follows.

What’s a Standard watermark and their importance

If you want to know how to set Standard watermark in Microsoft word, I will take you through the full steps. Firstly, a standard watermark is a type which you can’t modify the font or colour. In simple terms, it is a watermark already defined by words hence you can’t modify it. The following are some of the importance of setting a standard watermark.

1) You can pass some information using it, for example Success, Good luck, e.t.c

2) You can inform the reader what the document is about. The reader will easily see your watermark than reading through the top page to find out, for instance, name of exams, brand i.e Britam, Toyota

3) Can be used to beautify- some people find using some types of watermark to be attractive. After knowing what’s a standard watermark and some of their use. Now let’s go through the steps on how to set watermark in Microsoft word. Below are the full steps for standard watermark.

Steps on how to set standard watermark

You can identify the document you want to set the standard watermark either duplicate document or drafted one. Then use the steps below to set up your standard watermark.

Step 1 – open word document

Open the word document you intend to add your watermark.

Step 2 – Choose page layout tab

Select “ PAGE LAYOUT TAB,” you’ll click on “WATERMARK.” Button. It’ll display a list containing standard watermarks for you.

How to set watermark in Microsoft word
Image of Microsoft word display.

Step 3 – choose from available watermarks

You can now pick on the availability watermarks by just clicking on them. It will automatically apply the watermark to every page on your word document. For instance, we can select the watermark termed as “Confidential.”

How to set watermark in Microsoft word

Set Custom watermark

We can also set a custom watermark in your word document. If you don’t know what it is, a custom watermark is the type of watermark which you can modify the font, text, size, colour, e.t.c

Below are the steps on how to set watermark in Microsoft word/Custom watermark in particular.

Step 1 – open your word document

Open the word document you wish to include your watermark.

Step 2 – Go to page layout

Pick the “PAGE LAYOUT TAB” and select”WATERMARK” button as it’ll display options on Standard watermark. Go to the bottom where You’ll find the option “CUSTOM WATERMARK”

Step 3 – Select custom watermark

Choose the custom watermark option and it’ll display a dialogue box “PRINTED WATERMARK.”

How to set watermark in Microsoft word

Step 4 – Apply your watermark

You can now pick a picture as your watermark. We are not ruling predefined Text watermarks. You can type your custom text on the “TEXT BOX” located in “PRINTED WATERMARK” dialogue box. You can use “DUPLICATE” as your text format then set our size, Font, and colour. As soon as we set all the parameters, you will click “OK” to apply them.

How to set watermark in Microsoft word.

Those are the steps on how to set watermark in Microsoft word. We have included the steps for both custom and standard watermark. All the best

Also read How to find and replace text in word(plus shortcuts)

15 pros and cons of selling feet pics you must know

15 pros and cons of selling feet pics you must know, compiled here. In the current situation the economy has raised the bar high, for one to be successful in business you must take risk . At this existing time self employment is amidst the good ways of becoming an entrepreneur.

Their are numerous business that one can outset and grow smoothly. For now we venture in selling feet picture. Before you put down the asset of running this business try to get deep in the key aspect of this business. Every business has an advantage and a disadvantage. Today we narrow down to some of the 15 pros and cons of selling feet pics you must know.

15 pros and cons of selling feet pics
Image from google.

We onset with the pros of this business. Here are some of them

Pros of selling feet picks

If you are looking forward to do this business, below are the advantages of it.

Suitable at any environment

This is also one of the 15 pros and cons of selling feet pics online. To start a feet pics business does not require one to be at a particular area. One can do it from any place in the world provided that he or she is ready the business can go on. You can do it in the house or outside, sometimes on street to crown it location is not a factor of consideration.

Not to forget you can get access to your client even if the distance is far . For example one can be Italy while the other in China. Provided that both of you an get internet connection. In simple terms the environment is not a factor.

It’s cheap to start

Starting a feet pics business does not require a huge income to start . What are i required are like a good camera and a lighting gadget . If you like you can use your friends to take the photographs. In addition you can hire a photographer. The factor here is getting quality pictures that you will send to your clients. Amidst of all when hiring someone the price is negotiable. It is one pros we had to include in this list of 15 pros and cons of selling feet pics.

Time flexible working hours

This kind of business one can do it after work or before, Since it does not require a rigid time plan . As long the required asset are available then it’s well to go on. To finalize one is able to work at his or her convenient time , you can also do it at your own will. It is absolutely one of the 15 pros and cons of selling feet pics online.

An alternative source of income

Mostly people who grow in terms of income do not depend fully on salary. This part time job is amidst other sources of income. One can rapidly grow till to a limit that it pays more than your job. At the time that it takes over you can decide and quit your job then continue with the business.

An alternative source of savings

Sometimes the burden that one carry in th e name of support is heavy . Such like can be supporting the family in paying school fees , basic needs and others . This might be huge till it extinguish your full salary. At this situation one can not make savings. This business will give you a backup income hence one can save. This saving can help during emergencies. Further you can use after retirement. No doubt that it’s one of our 15 pros and cons of selling feet pics you must know.

Can help in sorting debt

In human life their is a time of hardship. At this moment the situation push you to acquire debt. Now the big deal comes on how to pay the debts. Sometimes the salary is insufficient so when you do such like business ,the income earn can sort out the debt .

Investment

Selling feet pics is like making an investment in business. This part time job can earn you an extra coin that you can invest somewhere else.

An opportunity to expand your brand

If you do it perfectly and continuouslly you will attract the public attention. Afterwards you will connect to variety of clients from all over the world. At this point your social media pages will be boosted and you will get more people to connect with. Finally you might decide and start a new brand if you want to quit.

Also read How to choose the right CCTV camera

Fun and lucrative way of earning

Taking pictures is another way of having fun. This kind of business when you do it with your friends in different locations you get excited . You also get chance to be popular which is a great thing in life. What a vital point in this list of 15 pros and cons of selling feet pics you must know.

On the other side, you earn in an easy way

The income you’ll earn can be used to move around and visit places in case of insufficient salary. This is another way of having fun.

Cons of selling feet pics

15 pros and cons of selling feet pics

After looking at the pros of this business. Now let’s look on the other side of the business, the following are cones of it:

Criticism feedback

Some clients might not be contented with what you post. Some people also are jealous of your post . At this moment you will have a negative feedbacks. It can be on social medias pages or directly to you. Difficult time with clients. A great point to include in our 15 pros and cons of selling feet pics you must know.

Not everyone one will need the pics in the same like yours

Different client give out the condition on how they would like it.This creats a harsh time between you and the client. Scammers and brokers. In this field is a kind of host to such like people.

Some clients do not comply with the agreement. In addition you might be coned.

Must read Living in Austin Texas, pros and cons

Theft

To enlighten you sometimes one might need a content to use somewhere like dating apps , website or even online

So your content is used without your permission. It really deserves to be part of our 15 pros and cons of selling feet pics you must know.

Stricted to areas with internet connection

You can only do this kind of business when you can access the internet. Areas with poor internet connection can lead to failure. It is a vital con to include in this list of 15 pros and cons of selling feet pics you must know.

Conflict with the religious beliefs

This is the final point in our list of 15 pros and cons of selling feet pics you must know. Some religious beliefs prohibit this kind of business hence it creat a hard time. To crown up selling feet pics is amidst side hustle that can earn you a huge income.

How to find and replace text in word(plus shortcuts)

How to find and replace text in Word. (plus shortcuts), compiled here. You might have typed a particular text or phrase but looking forward to replace it. In this article, I will take you on steps how to find and replace text in word. I have also included some shortcuts to save your time. Below are the steps with their corresponding images.

Using find command

You can locate a particular text in your document using the “Find command.” Below are the steps you can follow if you are looking forward to find and replace text with the find command.

  • Step 1 – type =rand() on empty word document We are going to illustrate with you on the sample shown from the screenshot below. You can type =rand() then Enter to get a similar one.
How to find and replace in Microsoft word
  • Step 2 – Go to home tab or press Ctrl F You can launch the navigation pane by going to the “home tab” and select the “ find” command. You can also use the shortcut key Ctrl+F in your keyboard.
How to find and replace, find command.
  • Step 3 – search the word you intend to find You can now type the word you are looking forward to replace in the search box located on the left side of the screen. In our screenshot below, we’ve type the word we are looking forward to replace. In our example we have typed “document” and you’ll notice that word will highlight the word yellow as soon as you finish typing.
How to find and replace text in word, Search box.
  • Step 4 – you can clear and perform another search You can use the clear button to clear both the results and search as you perform another search.
  • Step 5 – you can use further options to find words In this step, you can click the “option button” to display options menu as you pick “Options.” You will come across a list of options. You can choose options like “Match case” in order to perform case sensitive search.
How to find and replace text, options dialogue box.
  • Step 6 – close the search operation when done This is the final step after you’ve find what you want to replace. You can now close the search operation by clicking the close (X) button.

Also read 7 best video editing apps for free without watermark

Replacing the word

You should now be good in finding words or phrases in your word document. You can now replace your existing words in your document. We can take you through the steps below:

  • Step 1 – click on replace button On your “Home tab” you’ll pick the “Replace button” in the “Editing group.” Alternatively, you can use the shortcut key Ctrl + H to launch your “Find and Replace” dialogue box.
  • Step 2 – type the word you intend to replace. Here you’ll be able to “Find and replace” the words you want. You can look in the screenshot below from the dialogue box.
  • Step 3 – click the replace button On the “Find and replace” dialogue box, click the “Replace” button. You will notice that your “replace with” word on your dialogue box will replace the searched word. You can also replace the next searched word in the occurrence by clicking “replace.” You can also replace all the words that have been found by clicking “Replace All” button. In case of you want to get the next occurrence, you’ll click on “Find next” button. Finally, click replace to replace the word found.
  • Step 4 – Use more “button” for specific search On your dialogue box, you can use “More” button in case you’re looking forward for a more specific search, for example searching the whole word, or sensitive search.
  • Step 5 – click close or cancel button Once you are done with the process of finding and replace. On the dialogue box, you’ll close the box by clicking “cancel” or Close “button”

Those are the steps to find and replace in Microsoft word, All the best!

Must read How to add subscriber button to YouTube videos

How to choose the right CCTV camera

How to choose the right cctv camera, compiled here. There are a number of things you’ll have to consider when selecting your CCTV camera. The first thing is to determine what type of camera you require.

We have three types of CCTV camera.

BULLET cameras are the most popular type of CCTV camera. They are compact and small, therefore, easy to install them. They are also very affordable.

DOME cameras are also a popular type of CCTV camera. They are often used in commercial settings because they are less likely to be tampered with.

PTZ cameras are the most expensive type of CCTV camera. It is used for more advanced surveillance systems because they can be controlled remotely.

Another thing you’ll consider is the camera resolution. When the resolution is higher, the image quality will also be better. However, expect higher resolution cameras to be more expensive.

Finally, you’ll have to decide the location to place the camera. The location of the camera will affect the type of camera you need. For example, if you want to place the camera outside, you will need a weatherproof camera. When you have considered all of these factors, you will be able to choose the right CCTV camera for your needs.

What Are The Different Types Of CCTV Cameras?

There are four main types of CCTV cameras:

  • Bullet cameras
  • Dome cameras
  • C-mount cameras
  • PTZ cameras

Bullet cameras are one of the most popular types of CCTV cameras. They are small and compact, making them easy to install, and they have a wide field of view.

Dome cameras are another popular type of CCTV camera. They are named for their dome-like shape, and they are often used in indoor security applications. Dome cameras are less obtrusive than bullet cameras, and they offer a wide field of view.

C-mount cameras are a type of CCTV camera that is often used in industrial and commercial applications. They are larger than bullet and dome cameras, and they require a special mount. C-mount cameras offer a wide field of view and are often used for surveillance in large areas.

PTZ cameras are a type of CCTV camera that can be controlled remotely. PTZ stands for pan, tilt, and zoom, and PTZ cameras can be moved to different angles to get a better view of an area. PTZ cameras are often used in security applications where a wide field of view is needed.

What Are The Factors To Consider When Choosing A CCTV Camera?

How to choose the right CCTV camera.

When it comes to choosing a CCTV camera, there are a variety of factors that you need to take into consideration. This will make sure you’re making the best decision for your specific needs. Here are a few of the main things to keep in mind:

The type of camera.

There are a few different types of CCTV cameras on the market, so you’ll need to decide which one is right for your needs. For example, if you need a camera for outdoor surveillance, you’ll need to make sure you choose one that’s weatherproof.

The camera resolution.

This is an important factor to consider. You should make sure the camera you choose can provide clear and concise images.

The camera’s field of view.

This will determine how much of an area the camera can cover, so you’ll need to make sure you choose one that can cover the area you need it to.

The camera’s price.

Obviously, you’ll need to make sure you stay within your budget when choosing a CCTV camera.

The camera’s features.

Some CCTV cameras come with a variety of features, such as night vision or motion detection. Decide which features are most important to you and make sure the camera you choose has them. Consider the convex mirror price in Bangladesh

Determining on the budget will help you make a good buying decision. Keep these factors in mind when choosing a CCTV camera and you’ll be sure to choose the best one for your needs.

How Do I Know If A CCTV Camera Is Right For My Needs?

How to select CCTV camera

If you’re considering a CCTV camera for your home or business, you may be wondering if it’s the right security solution for your needs. Here are a few things to keep in mind that will help you decide if a CCTV camera is right for you:

What are you hoping to achieve with a CCTV camera?

Are you looking to deter criminals from targeting your property? Or do you need to monitor activity on your premises for security purposes? Knowing what your specific goals are for installing a CCTV camera will help you determine if it’s the right solution for you.

What is your budget for a CCTV camera?

CCTV cameras can range in price from a few hundred dollars to several thousand, so it’s important to know how much you’re willing to spend on this security solution. If you have a limited budget, you may need to compromise on features or quality.

What are the risks and vulnerabilities at your property?

Before choosing a CCTV camera, you’ll need to assess the risks and vulnerabilities at your property. This will help you determine the type of camera that’s right for you. For example, if you’re worried about criminals breaking into your home, you’ll need a camera that’s able to capture clear footage at night.

What are the local laws and regulations?

Before installing a CCTV camera, it’s important to check local laws and regulations. Some states have laws that restrict the use of surveillance cameras, so you’ll need to make sure you’re following all the rules before you install one.

What type of camera do you need?

There are many different types of CCTV cameras on the market, so you’ll need to decide which one is right for your needs. Some factors to consider include the camera’s field of view, resolution, and storage capacity. If you’re still not sure if a CCTV camera is right for you, it’s a good idea to speak with a security expert. They can assess your specific needs and recommend the best security solution for your situation.

What Are The Benefits Of Using A CCTV Camera?

How to choose the right CCTV camera

Use of CCTV cameras has increased significantly in recent years as businesses and homeowners look for ways to improve security. There are many benefits of using CCTV cameras, including deterring crime, providing evidence in the event of a crime, and helping to keep people safe. CCTV cameras can act as a deterrent to crime by providing a visual presence that can deter would-be criminals from attempting a break-in or vandalizing property. In the event that a crime does occur, CCTV footage can provide valuable evidence to help identify the perpetrator and assist in their prosecution. CCTV cameras can also help to keep people safe by providing security in public places and monitoring activity in areas that may be potential hazards. For example, CCTV cameras can be used to monitor areas of a building that are prone to fires, or to provide security in car parks and other public areas.

The benefits of using CCTV cameras are clear. They can help to deter crime, provide evidence in the event of a crime, and help to keep people safe. If you are considering installing CCTV cameras, be sure to weigh up the benefits and costs to ensure that they are the right security solution for your needs.

If you’re still unsure about which CCTV camera is right for you, please leave a comment below and we’ll be happy to help.

Also Read 7 Best football games for Android 2023

7 best video editing apps for free without watermark

7 best video editing apps for free without watermark, compiled here. There are a lot of video editing apps on Google play store. When it comes to selecting the best video editing app, we look at a number of features offered. One of the best features is using an app that won’t print watermark in your videos.

Many people don’t like the watermark of the brand/app on their videos. However, a few apps comes with the mentioned features. Most of the time, this feature is considered a premium feature in some apps like Viva video. Therefore, we have compiled a list of best video editing apps for free without watermark. If you are a video creator, Youtuber, Tiktoker, and more. Check the following apps for creating video’s that are free from watermark.

1. Youcut video editor

This app really deserves to open this list of 7 best video editing apps for free without watermark. The app comes with a lot of features for free.

7 best video editing apps for free without watermark. Image showing You cut app.

Key features

– Has many features for free, ranging from music, video trimmer, join many videos, background music and more.

– It’s free of charge without watermark and banner ads.

– The app is user friendly.

– Split videos into two separate videos.

– Export quality videos you can use on your Tiktok, Instagram, and YouTube account.

– Has video cropper feature

How to add subscriber button to YouTube videos

2 Video editor- video Guru

This is also a great app to edit videos free of change without stamping watermark. This app has impressed many, imagine an app that has 4.6/5 stars from 2 million reviews. You can check it’s ratings on Google play and download if the features will impress you.

7 best video editing apps for free without watermark. Image showing how video editor- video guru looks like.

Key features

• Video crop

• Trim videos, compress, and adjust speed

• Good video quality without watermark

• Combine videos for Tiktok, YouTube, and more accounts.

• Offer different transition effects on videos

3. Filmir

This is another video editing app for free without watermark. The app comes with a number of features for free, they include, adding filters, transitions, effects, and more. Filmir is a great place to get premium look in your videos.

Key features

• You can import unlimited number of photos and videos.

• The transition between videos is smooth and unique.

• Has several fonts hence your text will stand out. • One great feature is no ads at all to interrupt.

• You can ad music in your existing file with just a simple search.

• You can get rid of watermark by going Pro or watching an ad.

• You can shoot videos using the app then edit

4 Qick

Qick is also a wonderful to edit your videos for free without adding watermarks in your videos. The app comes with a number of great features without necessarily purchasing the premium version. You can download this app on Google play store and access those great features. You will discover that the app has great ratings on Google play with a lot of downloads. The following are the key features offered by the app.

Image showing how quick app looks like.

Key features

• You can add as many photos and videos from the gallery, cloud storage and more.

• No watermark is left in your videos

• Can trim, rotate, and change video speed.

• You can add background songs in your videos for free.

12 best songs for Tiktok trending videos

5. FilmoraGo

FilmoraGo is also one of the best app to edit videos for free with stamping watermark. The app will enable you to create a number of videos using a number of free features. The videos are of great quality to share on Instagram, Tiktok, YouTube, and more.

7 best video editing apps without watermark. Image showing how FilmoraGo looks like.

Key features

• Loaded with a lot of free features.

• It is beginner friendly.

• It allows you to make high quality videos.

6. Video editor no – watermark and CU

You can just look at the name of this app. The app has promised to offer videos that are free from watermark. You can download this app and create lovely videos as you share on that vlogging platform. The app has more other features to its clients. It deserves to be in this list of 7 video editing apps without watermark.

Key features

• Can split or combine videos.

• Remove unwanted parts on your videos

• Offer smooth transitions between videos

• Add your own logo in your videos

• Can record and add your voice or commentaries

• Crop videos to emphasize or remove some elements.

7. Video maker music video editor

This app is wonderful in creating lovely videos that are free from watermark. If you are creating a video or slideshow together with your lover, this app has Ideal features. It can also create videos to use in vlogging. The app comes with wonderful features as follows

7 best video editing apps for free without watermark

Key features

• Smooth transitions in your videos.

• Offer great animation effects in your videos

• Has great materials to use in your valentines day.

• Compress your video like professional without losing quality

• Can merge different videos or images

• Can trim video to remove unwanted parts.

• Offer Music that are licensed hence making videos popular.

12 ways to make money online for free

Conclusion

Those are the 7 best video editing apps without watermark. We have made our research from Google play store ratings. We have also installed some of the apps and tried for ourselves. You won’t go wrong with the above apps.

How to add subscriber button to YouTube videos

How to add subscriber button to YouTube videos, compiled here. To succeed in YouTube channel, you have to be quick in uploading videos for your subscribers. In other words, YouTube need consistence in order to succeed. Therefore, you can look for a way to add subscriber button automatically to your videos.

This process will save time as well as improve on the number of subscribers. In this article, I have steps you can follow to add subscriber button to YouTube videos. Let’s dig in Steps to add subscriber button on YouTube videos Before getting into the steps of adding a subscriber button in your YouTube videos. Let me take you through the requirements first.

Requirements

• PNG, Gif, or Image of small size, we recommend 150 by 150 pixel.

• Image should be 1mb or less.

• Good browser like Chrome. A browser that should allow you to switch to desktop view. • Good Internet connection.

• Login credentials of your channel.

Step 1-log into your YouTube channel

Go into your browser to log into to your YouTube channel. Don’t use the mobile app since it doesn’t have some of the features of this process. You can log into your channel in YouTube website www.youtube.com

Step 2 -change to desktop view in phones

If you are using a mobile phone, you can change into desktop view so that it can look like a desktop. The desktop view in chrome browser is situated on three vertical dots at the top right corner. Move down and pick desktop view, it’ll reload to make it look like a desktop/computer. This will allow you see every feature, so you’ll click your profile picture at the top right.

6 best Places to watch football online for free

Step 3 – Go to your channel page

After clicking on your profile picture, it’ll show you different options. Pick the first option which is named as “Your channel.”

Image showing where you'll find "you channel" button.

Step 4 – customization page

On your channel, you’ll gain access to a new page where you’ll select “Customization channel.”

How to add subscriber button on YouTube videos. Image showing customization page

Step 5 – Branding

You will gain access to the customization page where you’ll switch to “Branding.” Check from the image below.

How to add subscriber button on YouTube. Image showing Branding.

Step 5- choose video watermark

You can then scroll down and Choose “Video watermark” option. Here you can ad your gif, or image that will be displayed in your videos. Upload your image of the right size and click done.

How to add subscriber button on YouTube.

Step 6 – select image

Another step is to select the image you’ll use as subscriber button. You will be given a preview of how your image will look like in your videos.

Step 7 – select display time

Here you can pick how long the subscriber button will be displayed in your videos. You’ll have options like the entire video, at the beginning, at the end, or select your custom time. It depends on what you want.

Step 8 – publish

Once you’ve done the above steps including your preview. It’s time to publish your subscriber button in your videos.

What you need to know

• When selecting the image to use, make sure to avoid images that will lead to copyright claims.

• You can create your own images using tools like canva, or take free ones Google.

• You can try PNG or Gif as your watermark subscriber button for Better results.

• The subscriber button won’t reflect immediately. You can wait for about 48 hrs to 3 days.

• A watermark subscriber button will take you one step ahead.

12 best songs for Tiktok trending videos 2022

10 ways to get free safaricom bundles in Kenya

10 ways to get free Safaricom bundles in Kenya, process to get with evidence of images here. Safaricom is a top company is Kenya founded in the year 1993. Safaricom has grown over the years to be used widely in Kenya. Today, safaricom has at least 36 million customers, using the line in calling, internet, sending money and more. Safaricom has come up with services for its loyal customers and also new clients. One of the best offers from safaricom is offering free internet bonuses. In this article, we have compiled a list of 10 ways to get free safaricom bundles in Kenya. Therefore, with a safaricom line you’ll get free internet bundles via the following ways.

New safaricom line

This is one of the best way to receive free safaricom bundles. Safaricom being a top company in Kenya and working tirelessly to get new customers. They have special way to welcome new members by giving free bundles to new safaricom lines. You can even buy a second safaricom line to get their free bundles for new lines.

Download the M-pesa app – ways to get free internet by Using app

Safaricom m-pesa is a popular way to send money in Kenya. Safaricom users who register in the m-pesa app for the first time are awarded free bundles. Make sure you download and install, then register your safaricom number in this app. You will be awarded free 500 bundles and sh.100 in your safaricom line and M-pesa respectively.

Safaricom advertising M-pesa app for customers.

Safaricom Zuri bundles – ways to get free internet through referal

This is also among the 10 ways to get free Safaricom bundles and access free internet. Safaricom Zuri is a programmed WhatsApp number to offer safaricom services. Users can access safaricom services via this number. Safaricom users are able to manage subscriptions, check balance, buy minutes, and more using the number. Impressively, you will be awarded 50 mbs when you refer someone to use safaricom zuri. Just text safaricom Zuri on WhatsApp, it will automatically reply. On the main menu, pick option 5(tell a friend) as shown in the image below. You can refer as many people as possible, and you’ll get 50 mbs per referral.

Get free bundles from Safaricom Zuri. Advert of Zuri by Safaricom company

Birthday bundles – Guarantee birthday bundles for Safaricom users

If you are a user of safaricom line, you will be able to enjoy a number of their offers. Safaricom normally gives guarantee birthday bundles to their customers. The bundles will be given to your main safaricom line, the first line you registered with your ID. When you are almost celebrating your birthday, make sure your safaricom line is active. You will be awarded 1 GB birthday bundles.

Evidence of customer's message for getting free birthday bundles.

Download Safaricom app

Apart from downloading the M-pesa app, you can also get free bundles from safaricom app. You will have to download and install the app in your phone. Thereafter, make sure to register on the app with your safaricom line. You will be awarded free bundles in your safaricom line after registering in this app.

Free nyakua bonuse data

Nyakua is one of the latest offers from safaricom. You can access this offer by dialling *544# then pick option 0 which is nyakua bonus. In “nyakua bonus,” you can either check your target, daily spend, free data balance, and more. All you need to do is subscribe in nyakua then reach your daily target to get the free bundles. They will give you a target, of which you can also check in “nyakua bonus.” Let’s say you have a target of 150mbs, you’ll have to reach that daily target then you’ll be given free 150mbs. All you have to do is buy bundles then attain nyakua target to receive free bundles. You can check from the image below.

Ways to get free Safaricom bundles, Safaricom advertising nyakua bonus offer.

Baze bonus

Dial *544# then select Entertainment bundles on option 6. Thereafter, You will choose option 0 which termed as “unlock baze bonus.” Here you’ll need 10 shillings credit then you’ll be awarded baze pass to enjoy 500mbs free on daily basis. The free 500 mbs will be given to you for the next 3 days. Thereafter, you can choose to continue subscribing and enjoying baze bundles for 10 shillings daily or opt out.

Ways to get free Safaricom bundles. Advertisement of base free bundles and the popular local programs to watch.

Viusasa data pass

Dial *544#, and choose Entertainment bundles on option 6. After loading USSD, pick option 7 which is named as Viusasa. The Viusasa option will direct you to another page where you’ll select the free data for the mentioned options. You can select Soaps data pass, elimu data pass, or news data pass. You will be awarded free 100 mbs to watch your favourite topic from the mentioned options. Note that the data can only be used on Viusasa. Thereafter, you can access the selected topics for free on Viusasa

Ways to get free Safaricom bundles, image showing options to choose from.
Topic you can select for free bundles

Free 50 mb opera mini data – Guarantee for latest opera mini version

Opera mini is a popular app in Kenya. In this app, you can browse, or read news. You will also get free 50 mbs safaricom bundles and access some sites. All you have to is download and install the latest version of opera mini app. When you open the app, you’ll automatically be awarded free 50 mbs on daily basis. Check the 50 mbs reward from opera mini below. The reward is guaranteed to safaricom line users. However, the free bundles from opera mini will work well on specific sites. Just to mention a few, including odibet, sportybet, Facebook via opera mini, and crypto currency via opera app.

Ways to get free Safaricom bundles, advertisement of Safaricom and opera mini partnership to give free daily bundles.

Free Facebook – access Facebook free mode with Safaricom line

This is also a fantastic way to access free internet via safaricom line. Individuals with safaricom line can browse on Facebook app without bundles. Though you will need bundles to see videos and some images. But it’s a great way to access posts, chart, or comment on Facebook without data bundles.

Also read 8 best self employment courses in Kenya

Safaricom offers free 500 minutes to its clients, See how to you to access the free minutes

The main mobile service provider of Kenya, Safaricom, has come up with finger licking offers to it’s clients. The network offers a massive amount of free minutes. The mobile network operator speaking through the official Twitter page, you can enjoy the luxurious freedom to speak comfortably with loved ones, close friends, families and relatives, from the 500 free minutes provided. I clarified that I could do it myself. You can also take a look at the procedures established for accessing the service.

photo of safaricom Chief executive, Peter

Take a look at all the requirements for accessing free minutes. To get your minutes, the mobile service providers cited that you can dial *400#on your Safaricom line. Then, subscribe to Safalicom’s home fibre. You’ll be good to go. Therefore, “Imagine getting your minutes maximum of 500 minutes, who will be the first person to call?

Thank you for reading, please comment and follow us for more information.