Tag Archives: Softwares

How to set watermark in Microsoft word

How to set watermark in Microsoft word (Standard/Custom), compiled here. Microsoft word is widely used in many institutions/places. We have schools, hospitals, and more others. If you aren’t sure what watermark is, in simple words it’s a picture or word that appears faintly behind your text in the word document.

You can try to watermark the documents you have drafted. Alternatively, you can also watermark a duplicate document and compare. Microsoft word will allow you to include standard or custom watermark in your documents using some steps as follows.

What’s a Standard watermark and their importance

If you want to know how to set Standard watermark in Microsoft word, I will take you through the full steps. Firstly, a standard watermark is a type which you can’t modify the font or colour. In simple terms, it is a watermark already defined by words hence you can’t modify it. The following are some of the importance of setting a standard watermark.

1) You can pass some information using it, for example Success, Good luck, e.t.c

2) You can inform the reader what the document is about. The reader will easily see your watermark than reading through the top page to find out, for instance, name of exams, brand i.e Britam, Toyota

3) Can be used to beautify- some people find using some types of watermark to be attractive. After knowing what’s a standard watermark and some of their use. Now let’s go through the steps on how to set watermark in Microsoft word. Below are the full steps for standard watermark.

Steps on how to set standard watermark

You can identify the document you want to set the standard watermark either duplicate document or drafted one. Then use the steps below to set up your standard watermark.

Step 1 – open word document

Open the word document you intend to add your watermark.

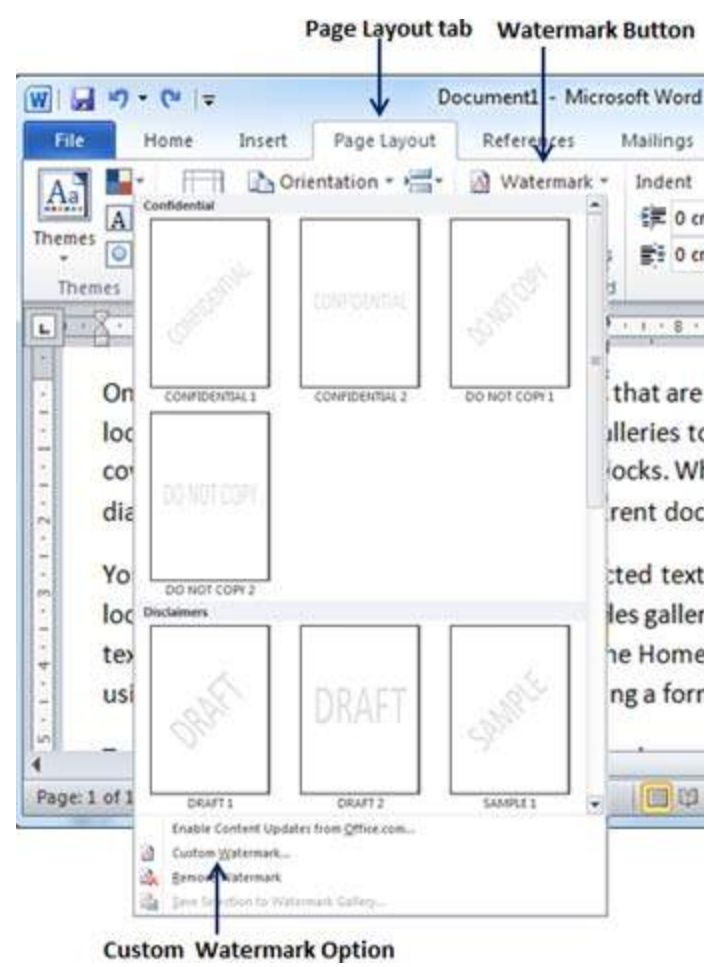
Step 2 – Choose page layout tab

Select “ PAGE LAYOUT TAB,” you’ll click on “WATERMARK.” Button. It’ll display a list containing standard watermarks for you.

How to set watermark in Microsoft word
Image of Microsoft word display.

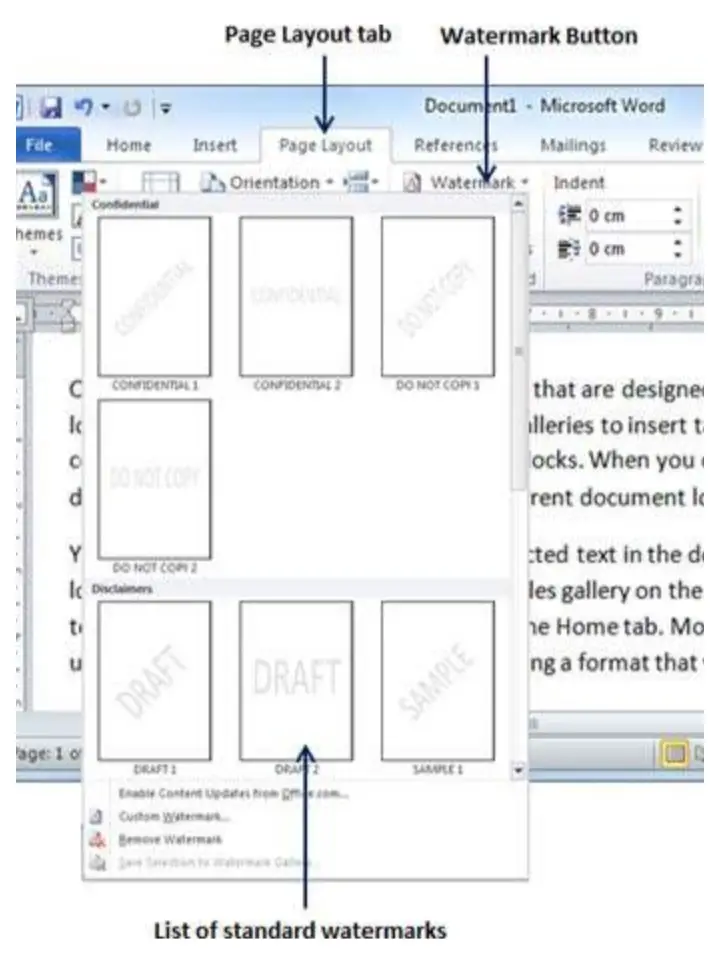
Step 3 – choose from available watermarks

You can now pick on the availability watermarks by just clicking on them. It will automatically apply the watermark to every page on your word document. For instance, we can select the watermark termed as “Confidential.”

How to set watermark in Microsoft word

Set Custom watermark

We can also set a custom watermark in your word document. If you don’t know what it is, a custom watermark is the type of watermark which you can modify the font, text, size, colour, e.t.c

Below are the steps on how to set watermark in Microsoft word/Custom watermark in particular.

Step 1 – open your word document

Open the word document you wish to include your watermark.

Step 2 – Go to page layout

Pick the “PAGE LAYOUT TAB” and select”WATERMARK” button as it’ll display options on Standard watermark. Go to the bottom where You’ll find the option “CUSTOM WATERMARK”

Step 3 – Select custom watermark

Choose the custom watermark option and it’ll display a dialogue box “PRINTED WATERMARK.”

How to set watermark in Microsoft word

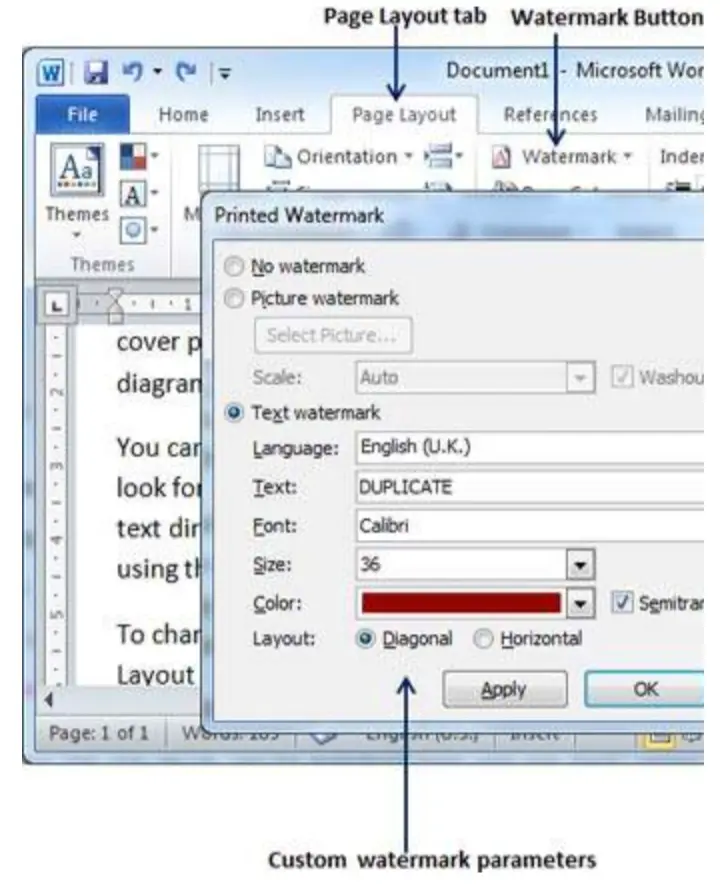
Step 4 – Apply your watermark

You can now pick a picture as your watermark. We are not ruling predefined Text watermarks. You can type your custom text on the “TEXT BOX” located in “PRINTED WATERMARK” dialogue box. You can use “DUPLICATE” as your text format then set our size, Font, and colour. As soon as we set all the parameters, you will click “OK” to apply them.

How to set watermark in Microsoft word.

Those are the steps on how to set watermark in Microsoft word. We have included the steps for both custom and standard watermark. All the best

Also read How to find and replace text in word(plus shortcuts)

How to find and replace text in word(plus shortcuts)

How to find and replace text in Word. (plus shortcuts), compiled here. You might have typed a particular text or phrase but looking forward to replace it. In this article, I will take you on steps how to find and replace text in word. I have also included some shortcuts to save your time. Below are the steps with their corresponding images.

Using find command

You can locate a particular text in your document using the “Find command.” Below are the steps you can follow if you are looking forward to find and replace text with the find command.

  • Step 1 – type =rand() on empty word document We are going to illustrate with you on the sample shown from the screenshot below. You can type =rand() then Enter to get a similar one.
How to find and replace in Microsoft word
  • Step 2 – Go to home tab or press Ctrl F You can launch the navigation pane by going to the “home tab” and select the “ find” command. You can also use the shortcut key Ctrl+F in your keyboard.
How to find and replace, find command.
  • Step 3 – search the word you intend to find You can now type the word you are looking forward to replace in the search box located on the left side of the screen. In our screenshot below, we’ve type the word we are looking forward to replace. In our example we have typed “document” and you’ll notice that word will highlight the word yellow as soon as you finish typing.
How to find and replace text in word, Search box.
  • Step 4 – you can clear and perform another search You can use the clear button to clear both the results and search as you perform another search.
  • Step 5 – you can use further options to find words In this step, you can click the “option button” to display options menu as you pick “Options.” You will come across a list of options. You can choose options like “Match case” in order to perform case sensitive search.
How to find and replace text, options dialogue box.
  • Step 6 – close the search operation when done This is the final step after you’ve find what you want to replace. You can now close the search operation by clicking the close (X) button.

Also read 7 best video editing apps for free without watermark

Replacing the word

You should now be good in finding words or phrases in your word document. You can now replace your existing words in your document. We can take you through the steps below:

  • Step 1 – click on replace button On your “Home tab” you’ll pick the “Replace button” in the “Editing group.” Alternatively, you can use the shortcut key Ctrl + H to launch your “Find and Replace” dialogue box.
  • Step 2 – type the word you intend to replace. Here you’ll be able to “Find and replace” the words you want. You can look in the screenshot below from the dialogue box.
  • Step 3 – click the replace button On the “Find and replace” dialogue box, click the “Replace” button. You will notice that your “replace with” word on your dialogue box will replace the searched word. You can also replace the next searched word in the occurrence by clicking “replace.” You can also replace all the words that have been found by clicking “Replace All” button. In case of you want to get the next occurrence, you’ll click on “Find next” button. Finally, click replace to replace the word found.
  • Step 4 – Use more “button” for specific search On your dialogue box, you can use “More” button in case you’re looking forward for a more specific search, for example searching the whole word, or sensitive search.
  • Step 5 – click close or cancel button Once you are done with the process of finding and replace. On the dialogue box, you’ll close the box by clicking “cancel” or Close “button”

Those are the steps to find and replace in Microsoft word, All the best!

Must read How to add subscriber button to YouTube videos